How To Take Amazing Photos With The DJI Mini 3 (and 4) PRO
- Albert Dros
- Sep 22, 2023
- 7 min read
Updated: Sep 25, 2023

It’s been a while since my last article on drone photography (2019 to be precise). Since then I’ve used lots of DJI drones. Earlier this year I bought a Mini 3 Pro to see if this could potentially replace bigger drones for my travels. And I have to be honest: I didn’t like it at first. The 48MP function was so slow and limited. It was a hassle to use and the drone just was not as stable as the bigger DJI drones when flying with stronger winds. I was quite disappointed and even returned the drone.
Fast forward a few months later, my bigger drone crashed in Thailand and I was kind of forced to buy the Mini 3 Pro to still be able to keep shooting aerials on my trip. Things changed here: I learned to appreciate its portability and how to deal with its ‘flaws’ and actually shot some beautiful shots with that little thing. I slowly started to fall in love with it and I am still using it on every trip until this day. I don’t even feel the need to bring a (much) heavier drone like the Air 3 or Mavic 3 Pro because I am confident in myself in creating the best shots with the Mini. Whenever I post aerial shots people are often surprised when I tell them they have been taken with the Mini 3 Pro.
In this article I’ll explain you all about how I shoot the best photos with the DJI Mini 3 Pro.
Please note that DJI just announced the Mini 4 Pro. Shooting settings with this drone will be similar to the techniques in this article.
If you want to see this article in video, check it out on YouTube:
RAW & Manual
First things first: make sure to have your drone set to save files in RAW (DNG). This way we maximise our dynamic range. Set your drone to PRO (bottom right on controller) and make sure it’s not set to AUTO. Turn on the Histogram on the screen if it isn’t. You can do that an the camera tab in the menu:

The 48 MP mode
Now this is of course why many photographers opt to buy the Mini 3 Pro. DJI markets these drones with ‘48mp’ sensors. But this is more a marketing gimmick, and it’s something we have to accept. The Mini 3 Pro has a 1/1.3 inch sensor. In logical thinking: You can’t produce a decently dynamic range RAW file in 48mp from such a small sensor. That’s simply not possible. DJI uses similar techniques than an iPhone and outputs 12 megapixel RAW files in normal mode, with decent dynamic range.
But of course, we do want to have these 48mp files, and they do come at a cost. By knowing the limitations and how to use 48mp files, you can get some decent to great results:
Use the 48mp mode in full manual (PRO) mode. Make sure your shutter speed is relatively fast for the best results.

Make sure to use a fast shutter speed. Using slow shutter speeds (slower than 1/50) has the possibility of unsharp images in 48MP mode, especially when it’s windy. So be careful with that.
Keep in mind that the 48mp ‘RAW’ files are not really RAW. They have the dynamic range of a JPG and don’t leave too much room for editing. So you need to expose perfectly:
Use the histogram to expose ‘perfect’. Don’t shoot too dark, don’t shoot too bright. Don’t clip any part of the image.

Manual Multiple Exposures: In higher contrast scenes, shoot 1 frame for the darker parts (foreground) and shoot 1 or 2 more for the brighter parts (sky). There’s no automatic option to take multiple exposures so you will have to do it manually. It takes some time, but the result will be worth it in the end.

If you follow all these ‘rules’, you’ll be able to take shots in 48mp that are ‘worth it’. The sharpness is quite decent and the files are of high resolution. Be very careful with editing the files, as they quickly get noisy. So again, it’s important to take perfect exposures, and take more shots for the scene if necessary to have a bigger dynamic range to work with. These are easiest with daylight shots, but get more tricky with sunsets.
TOP TRICK:
You can shoot manual panoramas in 48mp mode. I often photograph vertical panoramas. It’s super nice that you can rotate the Mini 3 Pro camera 90 degrees to photograph vertical compositions. A trick I often use is rotate the camera, see how a frame looks in vertical, then rotate the camera back and shoot the same image in a vertical panorama (of horizontal frames). To do this you simply shoot 1 photo, point the drone a bit more down, shoot another photo, etc. Here’s an example:

Alternatively: if you shoot horizontal panoramas in 48mp, turn the camera in vertical position and photograph the panorama this way. This makes things much easier!

This takes time but can be really worth it for daytime shots. You end up with a huge resolution to work with!
Automatic Panoramas
The Mini 3 Pro has great automatic panorama functions. The one you’ll want to use is the ‘Wide Angle’ panorama function, not the ‘180 degree’. You get there by pressing the normal shot function, scroll down on the right to ‘panorama’ and select ‘wide angle’. This function simulates a wide angle shot by creating a grid of 9 images.

And the great thing about photographing panoramas is obviously: You have more resolution. Keep in mind that the drone shoots images of 12 megapixel in this mode, so with a grid of 9 images you get a much higher resolution output. Tips on photographing a good panorama with the Mini 3 Pro:
Shoot in PRO mode with full manual settings, not AUTO
Your camera view with be the center of the panorama. So you often want to aim a bit down with not much sky, because there will be a row on top of your ‘main camera view’ which will include the sky. It takes some practise to realise this, but once you shot some panoramas you’ll get the hang of it.
Use the histogram to expose properly: The 12 mp files have decent dynamic range. If nothing clips, you’ll be okay for postprocessing. If you have a bright sky and a dark foreground, simply take 2 exactly the same panoramas: one with a lighter exposure, and one with a darker exposure.
Make sure you setup save RAW for panorama. Even if you have your drone set up to save files in RAW, the panorama doesn’t automatically do this. You have to set this up in the menu.
Check your pano during your flight! This is something that I learned from my friend Daniel Kordan and didn’t realise before: You can simply check the output of your panoramas during your flight. Simply go to your library (press the little play button on the right on the controller screen) and you’ll find a low res preview of the JPG there showing the panorama you shot, already stitched by DJI. This is a great way to see your actual composition of your full pano. If it’s not exactly how you expected it to be, simply move or angle the drone a bit, and shoot another one. Then check again, until you have the desired result!

Panoramas are a great way to get higher resolution images with the DJI Mini 3 Pro. I use them all the time to overcome the low amount of megapixels.

Normal (12 MP) Shooting
Sometimes I simply have no choice but to shoot in Normal 12mp mode. Think of heavy winds where the 48mp simply doesn’t get sharp shots for example. I try to use the ‘normal’ mode only when I have no choice. Here are some tips to get the best results out of normal shots with the Mini 3 Pro:
PRO mode: As always, use full manual PRO mode.
Use AEB (5 shots) for more dynamic range during high contrasty scenes. If you shoot into a bright sunset, make sure your main exposure is already quite dark.
Shoot 5-7 shots in BURST mode for extra sharpness. These files will be exactly the same. But you can overlay these in postprocessing with a method called ‘noise stacking’ (it’s in my course, or check out how I use this in one of my videos on YouTube). This way you get a sharper result with less noise.
Last but not least: Nowadays there is some great upscale software. Think of Luminar Upscale AI, Adobe’s Enhance functions etc, that are getting better and better. You can upscale these drone shots for better results, especially after already applying noise stacking.
End Word
By accepting the Mini 3 Pro’s flaws and limitations, it’s actually a great drone to take anywhere. It’s super light and you just throw it into your camera bag. With the above techniques and some practise, it’s possible to take some great photos. A quick summary of how I use mine:
I shoot in 48mp whenever possible. This means with not much wind. If the scene has too much contrast, I shoot darker and brighter shots manually. I later blend these (the sky and the foreground) manually in post.
If I want to shoot wider, I use the automatic pano. Make sure to set it to RAW and use the ‘Wide Angle’ function (not the 180). If I quickly want to see how my pano looks, I quickly go into the library of my DJI controller and check the stitched jpg of the pano.
I only shoot in ‘normal’ 12mp mode when I have no choice. When I do, I often use AEB 5 shots with higher contrasty scenes, or BURST mode (5 or 7 shots) to later apply noise stacking for better sharpness and less noise.

Now lastly, it is important that this drone can replace bigger drones for most part, but not with everything. The most important factor is wind. While the DJI Mini 3 Pro is relatively decent when there are some winds, you can definitely not fly it in storms. While the bigger Mavics are actually very decent in super strong winds. I have flown Mavic 2 and 3 confidently in quite strong winds, but I wouldn’t try it with the mini. So if you’re visiting windy locations, you might not be able to get the shot with the Mini 3 Pro. And that’s currently the biggest ‘flaw’ of this drone that you simply can’t do anything about. Other than wait until the winds die down :)
Editing
of course, all of the shots in this article were post processed. If you want to learn how I do my postprocessing, check out my Full Course on Landscape Photography, which covers all of my techniques from beginner to advanced.
That’s all! I hope you found this article useful :)
Cheers!
Albert
Gear used in this article:
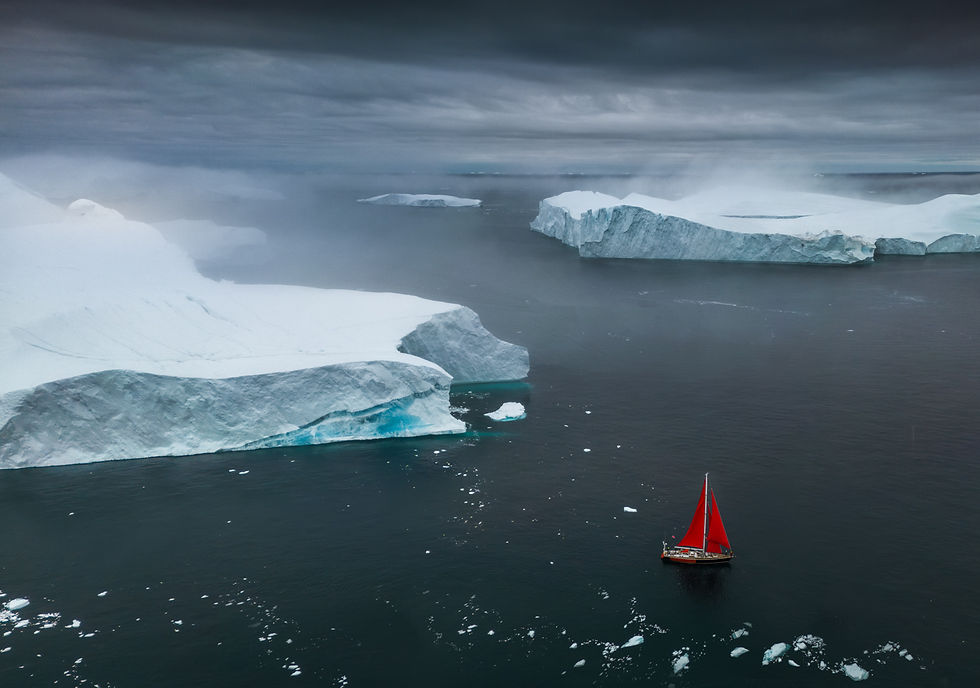
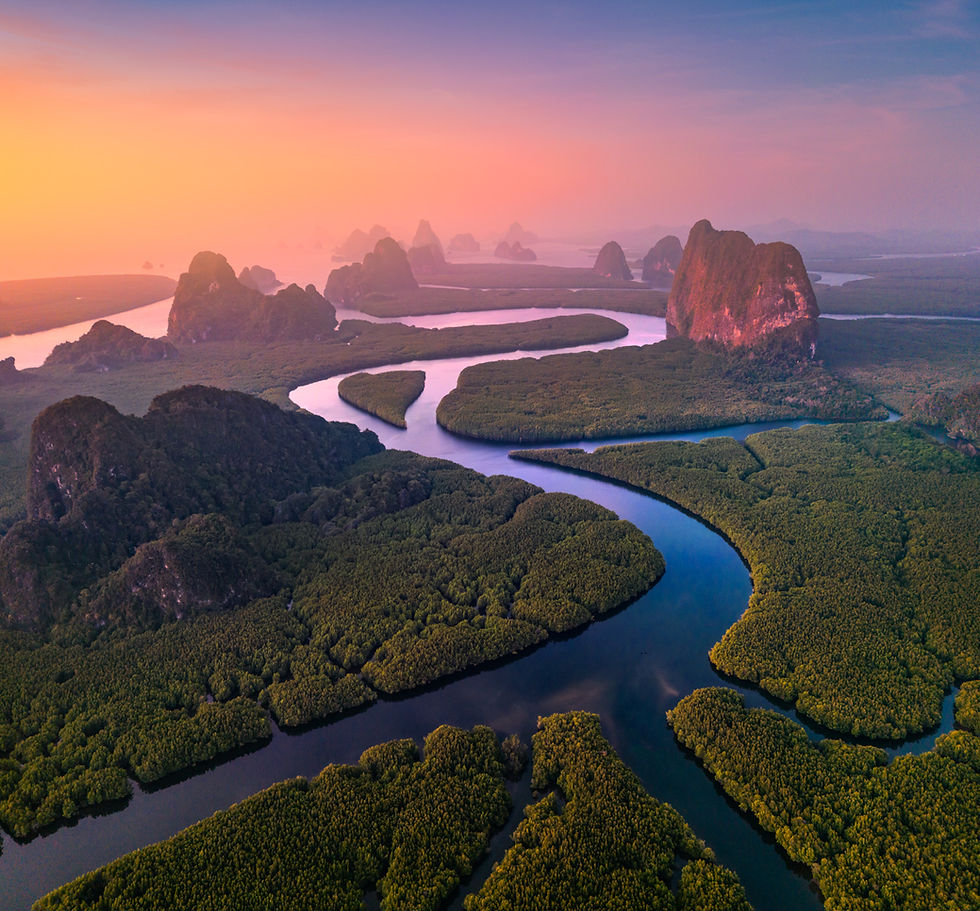
PS: Here are some more drone shots with the Mini 3 Pro: