The new A7RV for me as a Landscape Photographer
- Albert Dros
- Oct 26, 2022
- 14 min read
Updated: Nov 23, 2022

And so it’s finally here: the long awaited Sony A7RV. With the A7RIV announcement in 2019, it’s more than 3 years later. The A7RIV has been my main camera for my photos. But I have to say: With the many new Sony cameras that did came out in between (A7IV, A1, A7SIII etc), the body and functionality of the A7RIV started to feel a bit ‘old’. I was occasionally shooting with the A1 and was enjoying that more, mainly because of all the updates, the simpler menu, the speed, and simply all the extra functions. Now with the new A7RV, I feel like I am completely up to speed again and it has a lot of new great things for me as a landscape photographer. And I’m going to explain you all about it in this article.
DISCLAIMER: I am a Sony ambassador and have had this camera months before the original announcement on October 26. I was one of the first photographers in Europe using this camera and you can see me being featured in the original launch video. This article is NOT a review. It’s simply a sum up of how I use the camera as (now) my main body as a landscape photographer and all the new functions and features. Also: I do try to give you a lot of information, photos of the camera, and photos with the camera. But it’s not complete yet. I will update this article a few times with new information, mainly because I could not test everything properly yet due to the fact that there are was no RAW conversion available yet. I had to do some ‘tricks’ to be able to edit and see the RAW files, but they might have affected the files in some way. More on that later.

Look & Feel
Let’s get started with taking a look at the ‘new’ body. And by ‘new’ I mean it’s very similar to the A1 body, but with some buttons and dials shifted around. Don’t worry, it has a very similar feel to the A7RIV, but it feels slightly beefier, as it’s slightly thicker. Same as the A1. Honestly, after having used the A1 for quite a bunch of shoots recently, I started to really enjoy that body. It feels super nice in my (rather big) hands. But there was one thing that always bothered me: The top left dial that I needed to turn all the way to the other side when I wanted to switch to ‘bracketing’ mode fast. The A1 is a super fast camera, but that was the only thing that was not fast for me. With my A7RIV I switch to bracketing much faster, simply through the quick menu. Luckily, Sony probably figured out that wasn’t the best for landscape photographers (big target audience for the A7RV) and even though the body is similar to the A1, that dial is not there on the A7RV, so the switching to bracketing is still the same as on the A7RIV: perfect.

One thing that took some time getting used to after using the A7RIV for years was the new placement of the record button. This is now positioned on the C1 spot of the A7RIV (this change also happened in the A7IV). If you find this annoying, you can just customise the record button to whatever you had configured that button for on your A7RIV or similar body, that had the C1 and C2 buttons right there on top. So even though it’s different, you can set it up like the old way if you prefer. And if you’re used to the C1 and record button placement on the A1, they are switched around on the A7RV. Again, you can set those up the exact same as the A1 if you wish, via the customise button menu.
Let’s continue about the movie mode. The A7RV now has a handy new switch below the main dial on top. This switch lets you switch super quickly to movie or S&Q mode. We know this switch from the A7IV. What’s very handy about this is that you can completely customise the whole camera for video and just flip that one switch to start shooting video, with all the picture profiles and favourite settings going with it. Then when you shot a clip and want to switch back, simply switch back to photo and continue with photo shooting. And yes, the camera shoots 8k internally (25 or 30p)

Another physical change is the Exposure dial. This is the same as the A7RIV, but they removed the numbers off of it which is nog big deal. If you use Aperture mode on your camera a lot, you simply see the + or - exposure compensation on the screen and you don’t really look at the dial. That’s how I was mostly using it anyway.
Other things you’ll immediately notice is that you can now use the CFExpress cards (2 slots) and the Electronic viewfinder is much better. It looks much better if you’re used to using the A7RIV.
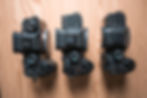
Comparison with the A1 and A7RIV
The Flip Screen
An entirely new physical thing on the body I want to talk a little bit more about is the new flip screen. Because this is very interestingly designed and it’s the first time I’ve seen this on a Sony body. I heard a lot of people were worried that it would be similar to the A7IV or the A7SIII as they have a fully articulating screen, but the A7RV is different. Actually, I was a bit worried myself because I like the A7RIV flip screen. But the A7RV is different, and it’s great, in my opinion. The screen flips, like the original A7RIV, but ALSO tilts! I know, that sounds weird and looks a bit weird at first, but it works absolutely great and I think it will be great for everyone. So if you had an A7RIV, you can just use it like you normally would. Or if you had an AIV, you can use it like that. But the great thing is, you can use it however you want. It flips out a bit, and then you can flip it out and rotate.

An example of how the screen flips up when I use the camera close to the ground. This is the same way I would use my A7RIV

Now when its flipped up, you can flip it out to the right, making it also perfect for vertical shooting
Now the great thing about this is you can use it with L-brackets. No issues at all with flipping the screen out with an L-bracket, simply because it pulls out a bit first, and then flips around, leaving enough space for the L-bracket to be in place. This mechanism is actually great, and works very well. I was able to flip my screen in every direction using an L-bracket. So when I use my camera horizontally, I use the flip screen similar to my A7RIV. When I get low to the ground, I simply flip it up. Then, when I use my camera vertically I flip the screen around and can also get a nice view with a low vertical angle. It’s basically the best of both worlds.

See how the screen pulls out a bit and then flips around. This makes it perfectly fine to use with an L-bracket (attached on this photo), both horizontal and vertical.
Here are some examples of mushroom shoot earlier this fall where I can’t really do without the flip screen anymore. The camera is basically on the ground (even too low for a tripod), where the flip screen is absolutely necessary:


New things inside!
You can see that Sony listened to us landscape photographers and put some great new features for us inside of the A7RV. Here’s the ones that were best for myself:
Focus Bracketing
Finally! I’m sure some of us had been waiting for this for a while already but this camera now finally has it: focus stacking! Or how it’s called inside of the camera: Focus bracketing. This is a technique I often use in the field to get images 100% sharp from the very front to the very back of the photo. I often use it with wide angle lenses where I get very close to my foreground subject, and simply can’t get both the foreground and background in focus, even at f/14 or narrower. This allows you to get a 3D-effect in a photo that I love myself.
How focus bracketing works in the camera: You simply select it in the shooting menu where you would normally select normal bracketing as well. It’s directly listed under that, so very fast to access. You can then select how many photos the camera will take. You can actually just put a very high number, as the camera will simply stop taking photos when it reaches infinity focus. You can also select a number from 1 to 10 on the distance in between the shots. This is a bit cryptic and I have tested a bunch of numbers, but when using a wide focus length (around 12-18mm) you are mostly fine putting it at number 10 (widest distance), but if you are shooting with telephoto you may want to put it to 5 or lower. When you are focus stacking with a macro lens, I recommend a very low number.

This is how the focus bracketing menu looks like on the camera menu
You then select the first focus point, the closest one to the camera. The camera will then simply shoot all the focus points from the first selected focus point to infinity. This will result in a number of photos with different focus points that you can then later stack together (in Photoshop or Helicon focus for example) to get a perfect sharp image from front to back. To have the camera do the focus points for you saves you a lot of time doing it yourself manually and most importantly: will make sure you don’t forget any focus points. People that occasionally use focus stacking will know what I’m talking about. It’s very fast to set up, and you can choose if you want the focus stack in a separate folder so you can easily identify it later on your computer.
Some examples of how I use the focus bracketing in camera:

A wide angle shot of this windmill where I positioned my camera very close to the plants in the foreground and framed the windmill in between. I wanted both the foreground and background very sharp.

Select the closest plant, set up the number of shots, and simply press the shutter. The camera takes all the photos and the above image is the result after stacking the shots in Photoshop.
Some more examples where this technique works very well and displays a lot of depth:

This photo is a great example of a photo where I would sometimes just miss focus points. It was shot on 18mm with the bottom left plant super close to the camera. 8 stacked photos were used.

Shot in Oregon in the US where a thin fog layer separated the elements. This was shot at 14mm with f/10, 7 stacked photos were used.

A tiny waterfall in madeira with lots of different layered elements: the plants, the little branch on top, and the layers in the mid/background with the waterfall. 27mm (with the 24-70 GMII), f/14, 6 shots.

Another example of Oregon in the US, which has some very cool looking trees and forests. Again I’m using a foreground element to create framing, where the foreground is completely sharp. This image consists of 6 photos at 24mm, f/10.
Now as you can see, I often use focus stacking with wide angle lenses but the automated focus bracketing allows you to use it in more precise situations, like macro for example:

This is a top down shot of little mushrooms that grew around a yellow leaf. This scene caught my attention. It required more than 20 shots to get everything perfectly in focus, shot with the Sony 90mm macro top down.
The focus bracketing allows me to do more shots I envision in the field and makes sure I don’t miss focus points again. Before this, I wouldn’t even try focus stacking a macro shot.
Update 23-11-22 : I released a detailed video about Focus Stacking on the A7RV: Watch it on YouTube!
The touch screen
To continue this, I do want to mention that it’s now also possible to set ‘touch-shutter’ for the touch screen. Instead of just focusing with the touch screen, the camera can take a photo immediately at the selected focus point. This is another way to use focus stacking if you don’t need to be super accurate and just quickly want to take 3-4 shots with different focus points. The touch screen also feels much more responsive and more like a smartphone. You can now just swipe between photos fast when you play them, and zoom in smooth and fast on them with hand gestures, just like you would do on your smartphone. It feels much faster than before on my A7RIV.
Longer than 30 seconds.
Yes, finally Sony realised that we don’t need a maximum of 30 seconds exposure without a remote in Manual shooting. When you go past 30 seconds, you can now select the option ‘BULB Timer’. You can set up the bulb timer via a simple menu option that I configured in ‘My Menu’ so I can always access it very fast. In the BULB timer menu you simply select the amount of seconds you want. That way you can take exposures of any time you want (let’s say 2 minutes) simply within the camera. Then you simply press the shutter and the camera takes the shot. You’ll see a countdown on the display so you don’t have to wonder when it’s finished.
As someone who often forgets his remote, this is something I have been wanting in the Sony cameras for a while already. And I’m sure I’m not the only one.
Some shots done with the Bulb-timer:
45 seconds

60 seconds

90 seconds

Other nice updates
Better Image Stabilisation of 8 stops:
As someone who quite often shoots hand held for flexibility, this is a very welcome addition. I did notice the IS was improved and was able to do hand held shots with quite low shutter speeds. Not sure if that’s really 8 stops though :)

A 50mm shot at f/16 where I had to hold the camera up quite high to get this red tree framed right in between the branches of the other tree. My tripod couldn’t get high enough so I had to shoot it hand held.
AI Autofocus
Sony put a new autofocus system in this camera that looks very promising. I didn’t get to test it out on every subject, but it can now not only track a lot of animals with eye-AF, but also cars, planes, insects and more. Apparently, it can also learn subjects via AI but I’m not sure how that works yet. It would be great if it could really learn on what you autofocus a lot on. For example, if I am shooting very tiny mushrooms in the forest, I like to focus on just the edge of the top of the mushroom. Autofocus doesn’t know that, and often focuses on just a slightly other part of the mushroom. Now if it could learn what I always autofocus on and adjust on that, that would be really cool. But not sure if it works like that :) As I’m writing this piece before the camera is actually announced, we will have to wait for Sony to be a bit clearer on that.

This is how the recognition been looks like, where you can select many things and Sony said they will add even more.
New Pixel Shift
Sony added an update to the pixel shift function that now works much better with movement. This will make it more ‘useable’. I actually didn’t use the pixel-shift function that much, just because of that. Now I have to test this out in the field more to comment on how well this works. With the current RAW files I wasn’t able to properly test this function yet.
Much better EVF
Looking through the EVF is SO much better compared to my A7RIV. The resolution has improved and the colours look beautiful through it. I really noticed a lot of difference.
‘New’ Menu
Obviously, the A7RV has the ‘new’ menu. I say ‘new’ because all recent Sony cameras already have this menu, but the A7RIV still has the old one.
Image quality
The A7RV has lots of great updates and the A7RIV really needed that update that is the A7RV. But what about the image quality?
For myself, I was already satisfied with the image quality of my A7RIV. The updates are what I really needed, and Sony delivered. But yes, it looks like the A7RV uses the same sensor as the IV, but does have some improvements. The color accuracy is better, and it should also perform slightly better in low light. However, I did not really got to test this in great detail yet.
The reason is obviously the RAW files. There is simply no RAW converter out yet that properly addressed the files. I was able to open them with Sony’s Imaging Edge software, but that way you can only export them to .TIF with not the full RAW capabilities. The closet I was able to get to the ‘real’ RAW was to use Exiftool to rename the Exif data to that of the A7RIV. With that, I was able to open the files in Lightroom and Camera RAW and edit them how I would normally do. However, I’m not sure if the color and RAW data is as accurate as it should be when doing that. Because of that, I don’t want to comment too much about the low light and other image quality yet.
We can of course conclude that the camera’s image quality is the same, and probably slightly better than that of the A7RIV. For some it might be a disappointment if you were expecting a higher megapixel count. For myself: I’m not sure we need much more than 60 megapixels on a full frame sensor right now, except if they can really deal with the noise on higher ISO. Actually, lots of people even prefer a lower amount of megapixel with a higher dynamic range and better ISO performance. I think that’s why Sony didn’t try to put the megapixels again on this one, For me, that was the right choice.
This part of the article will be updated as soon as soon as the proper RAW converters are there and when I have shot some more low light footage as well :)
End word
So what do I think of it? I still love my A7RIV, so for me the A7RV is simply great. It’s basically my A7RIV in an updated body with tons of new features on basically everything. Better AF, 8k video, Better Image stabilisation, lots of new features that are super useful for me as a landscape photographer. For me, it’s basically what I needed. I do want to test out the image quality more regarding low light performance and if we can see a real difference, so more on that later :)
Summary:
61 MP with beter color accuracy and slightly better low light performance (Sony said).
New AI Autofocus.
New body that looks like A1 and A7IV.
Totally new flip screen that works great for every direction and works well with L-bracket.
2 CFcard express slots (you can use SD-cards as well).
Movie switch that you can completely customise all movie settings on.
Better higher resolution EVF.
Touch screen improved and now also has touch shutter.
Better Pixel shift that handles movement better.
Focus Bracketing option: focus stacking for landscape photographers.
Bulb timer: Longer exposures than 30 seconds simply thought the menu. No remote needed.
Many more things that I probably forgot.
I am probably forgetting some other new features, but in the few weeks I used the camera I was so busy shooting on assignments and workshops that I just ‘used’ the camera how I would normally use it and wasn’t too focused on trying every single thing in the menu. I can say though, like usually I have used the camera in lots of different and wet conditions: Along the Oregon Coast, on Madeira Island in Portugal, and on foggy Dutch mornings. The camera often got soaking wet from rain and never had any issues. Remember that ‘accessory error’ that you would often get in rainy weather on your A7RIV or other Sony cameras? I didn’t encounter that on this one. Maybe that’s fixed as well :). On my few weeks of use, I really enjoyed the camera and will instantly get it when it comes out.
I was honoured to be one of the few who already had this camera months before the announcement and that Sony asked me to be featured in the launch videos in Europe. I hope this article was useful to you and that you enjoyed reading it. Feel free to ask me any questions about the camera and I’ll update this article very soon with new RAW image data, low light tests, video and more.
Thanks for reading and I’ll leave you with a bunch of more photos I shot in the last recent weeks with the A7RV.
Albert

Redwoods, US - Sony 12-24 GM - 22mm - f/8 - 1/8s - ISO 200

Macro Widerweb - Sony 90mm Macro - f/2.8 - 1/400s - ISO 320 - hand held

Madeira - Sony 12-24 GM - 21mm - f/14 - 1/50s - ISO 100 - hand held

Oregon Coast US - Sony 12-24 GM - 17mm - f/14 - 1/6s - ISO 100 - focus stack

Oregon Coast US - Sony 24-70 GM II - 35mm - f/14 - 0,4s - ISO 80

Madeira - Sony 12-24 GM - 12mm - f/10 - 1/6s - ISO 100

Oregon Coast US - Sony 12-24 GM - 17mm - f/14 - 1s - ISO 50

Macro Mushroom - Sony 90mm Macro - f/14 - 1/6s - ISO 200

Redwoods, US - Sony 12-24 GM - 12mm - f/11 - 1/3s - ISO 100

Oregon Coast US - Sony 24-70 GM II - 60mm - f/14 - 1/80s - ISO 200 - hand held

Redwoods, US - Sony 12-24 GM - 24mm - f/11 - 1/5s - ISO 100

Madeira - Sony 12-24 GM - 12mm - f/8 - 2,5s - ISO 160

Madeira - Sony 12-24 GM - 21mm - f/8 - 1/30s - ISO 100

Madeira - Sony 12-24 GM - 12mm - f/8 - 1/200s - ISO 100 - hand held